14/6/2024 - 28/7/2023 (Week 8 - Week14)
Teoh Gim Khoon (0361563)
Bachelor of Design (Hons) in Creative Media
Final Player - Playable Game
INSTRUCTIONS
For the previous game prototype, I focused on a partial tutorial level to test basic game mechanics like player controls, the health system, obstacles, spikes, and attacks. This was to provide a preview of my game design plan.
Now, in the Final Game Prototype, I'm implementing the complete game mechanics, including collectibles, enemies, and level building. I'm also creating game scenes, items, and adding sound to enhance the experience.
During the final stages of developing the game prototype, I truly experienced the essence of game development: the constant challenge of finding and fixing bugs. To address these issues, I consulted and reviewed lecture tutorial videos for specific problems and reached out to various AI tools for assistance.
Scenes
Let's begin with the game screen graphics for the start screen, level background, death or retry screen, tutorial and game level, and winning screen.Start Screen
- Play Button
Level Background
- Blue & Purple theme (Level 3)
- Space ship Level 2 (Level 2)
- Red & Orange theme (Level 1)
Tutorial & Level Design
Tutorial Level
Odyssey Level 2
GamePlay Item
There are several gameplay items incorporated into the game levels that players will encounter. These items are designed for interaction and to add missions for players to explore in each level.
Battery
Heart
Key
Spikes / Traps
Checkpoint
GUI Interface
The GUI interface for the game is designed to be clear and easy to understand. The player's health is represented by hearts located at the top left corner of the screen, indicating the remaining lives. The top right corner displays a battery counter, showing how many batteries the player has collected in the game. Additionally, there is a text panel that provides guidelines and feedback during gameplay to keep the player informed and engaged.
GamePlay Background Music & SFX
To enhance the game's experience and make it more engaging, I added background music and sound effects for various actions, such as player movement, item collection, weapon usage, and more. The music and sounds were sourced from YouTube and Freesound platforms.
*Music will be show in the Final Game Walkthrough
Player
- Walk
- Jump
- Landing
- Attack (Shooting)
Collectable
- Battery
- Key
- Key Spawn
- Heart
Activate
- Checkpoint
- Door
Final Game Design Document
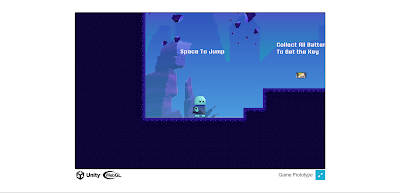
Stellar Odyssey UnityPlay
This is the exciting part where I created a game for the first time and uploaded it to the Unity platform for others to try out. I followed Mr. Razif's video guide, which provided a step-by-step method for the upload process.
Netlify Link: https://stellarodyssey.netlify.app/
Google Drive Link: https://drive.google.com/drive/folders/1Yi7JxxobeSg73GLYdAWsDa-gOvXw2plh?usp=sharing
Presentation & Walkthrough Video
Final Game Prototype Presentation
Final Game Prototype Walkthrough
Reflection
Looking back on this game development project, I consider it a highly valuable learning experience. Throughout the process, I delved into various aspects of game creation, from designing the game machine and preparing assets to structuring levels for player exploration. Using Unity for the first time presented numerous challenges and bugs, but overcoming them was immensely rewarding.
One of the key learnings was understanding the intricate process of creating a functional game machine. This involved not only developing the gameplay mechanics but also ensuring that all assets were well-prepared and integrated seamlessly. Designing the game level structure was another crucial aspect. It required careful planning and creativity to make the levels engaging and exploratory for players. This project also introduced me to C# scripting, which was fundamental in controlling game elements such as character movement, background music, sound effects, and overall game control. Learning to code in C# was challenging, but it opened up a world of possibilities for game development.
Throughout the development process, I encountered numerous challenges and bugs. Each issue required problem-solving and persistence to resolve, but these obstacles ultimately contributed to my growth as a developer. The satisfaction of seeing my game take shape and function as intended was incredibly fulfilling. This project reinforced the importance of effective planning, continuous iteration, and thorough testing.
Given the tight timeline, I am content with the progress I made. However, there were many features and improvements I wanted to implement but couldn't due to time constraints. Despite these limitations, working within the given constraints taught me to balance ambitious ideas with practical execution. In the future, I will plan development timelines more carefully to accommodate additional features and allow for smoother debugging
In conclusion, this game development project was an invaluable learning experience. It allowed me to explore my creativity, learn new skills, and overcome obstacles. I gained insights into the iterative nature of development, the importance of regular backups, and the significance of playtesting on multiple platforms. As I reflect on this project, I look forward to incorporating these lessons into future game development endeavors. I am eager to grow as a game developer and continue crafting engaging and immersive gaming experiences.


Comments
Post a Comment